Tuesday, March 31, 2009

Pizza Nights

One of my favorite homemade meals is Family Pizza Night. I love that the kids are part of the process of making their own food. They get their own individual-sized pizza that they can "decorate" as they see fit - often making smiley faces with the ingredients. They get to choose what they want and how much they want. They get to have fun making good food and the whole dinner process is a family event. Our standard fare includes pepperoni, red bell pepper, mushrooms, and pineapple. Emma goes for mostly pineapple "eyes" and red pepper as a "smile". Jack and Linda tend to include a little bit of everything - Jack starts with a design, but usually ends up wanting to include too much so he has to forgo with his original idea. As Emma pointed out last time, I'm the most boring - usually always including just the pepperoni (though often with fresh garlic slivers, oregano, basil, and red pepper flakes).

As with all of my doughs, I make this one in the bread machine. I've found that this recipe is plenty for the whole family. After the bread machine has done its work, I cut the dough into three equal pieces and then cut one of the thirds in half - this results in two smaller pieces (one for each of the kids) and two larger pieces (one for each of the grownups). We usually have leftovers for lunch the next day (except me - who apparently doesn't think one piece will be enough for lunch so it might as well be eaten now). After trying several different recipes, I like this one best - I found it online, but can't remember where.

Pizza Dough
1 cup lukewarm water
2 Tbsp honey
¼ cup olive oil
3½ cups bread flour
½ tsp salt
2 Tbsp yeast (this is quite a bit of yeast - you can use less, but I like the rise and taste this much yeast gives)

1) Place all ingredients, in order, into bread machine (or use your standard dough-kneading technique and skip ahead)
2) Set on dough cycle - watch and amend with more water or flour as needed after 4-5 minutes
3) When bread machine is done, remove dough from pan and punch it down
4) Cut dough into individual servings, form each serving into a ball, cover and let sit for 15-20 minutes
5) Pre-heat oven and pizza stone (if using) to 400-450°
6) Roll, pull, push, toss, or otherwise shape your pizza dough
7) Top with sauce (we use our standard tomato sauce - Pastene Kitchen-Ready tomatoes), cheese and toppings of your choice
8) Cook until dough is slightly browned and cheese is melted and bubbly
9) Cool for a few minutes, cut, eat, enjoy

A tip that I find works really well - if you are going to use a pizza stone, make and cook your pizza on parchment paper. After a few minutes in the oven, you can easily pull the parchment paper out and let the pizza finish cooking directly on the pizza stone.


(the one in the foreground is Emma's "spider-face" pizza)

Swiss chard on its way!

Looks like I may not need to resow my first Swiss chard batch after all. They're up and looking good. (Also exciting - I think I may see some carrot sprouts, but I'll give them a few more days to be sure)


Friday, March 27, 2009

March seedlings

I planted some lettuce and arugula seeds just under two weeks ago and they seem to have taken. The cold frame is doing its job - even with sub-freezing night temperatures all week. YAY!

(that's my flash drive in the photos for scale)

Lettuce:


Arugula:

(I think I'll need to thin the arugula at some point)

No signs of carrot or Swiss chard though, even with the temporary plastic cover I put on the other cold frame :( (though I don't really expect to see carrot seedlings for a while - they're notorious for taking a long time to germinate)

Tuesday, March 17, 2009

St. Patrick's Day Oatmeal Stout

Those of you who also stop by my other bog, from Archaea to Zeaxanthol, may remember that I have recently begun brewing my own beer. My second brew, an Oatmeal Stout, just happens to be ready today (honestly, I didn't plan it this way!) It turned out pretty good if I may say so myself. I'm not much of a stout connoisseur, but I'm very happy with this brew. I think it might be a tad too bitter - not sure if it's the hops or too much roasted barley. Maybe both. I'll have to try experimenting with amounts when I try brewing this again. For you home brewers out there, here's my recipe:

Oatmeal Stout
Method: Partial mash
Batch size: 5 gallons
Boil size: 2.5 gallons
O.G.: 1.054 F.G.: 1.015

grain bill
1 lb pale malt (2-row)
1 lb roasted barley
8 oz crystal malt (60L)
8 oz chocolate male
8 oz flaked oats

extracts
1 lb Amber dry malt extract
4 lbs Pale liquid extract

hops
3 oz East Kent Golding (45 minutes)

yeast
Irish Ale (White Labs, #WLP004)

bottle priming
4 oz turbinado sugar

1. Mash the grains in ~4.5 quarts of water at 155°F for 60 minutes
2. Sparge with ~2 gallons of 180°F water
3. If necessary, add water to achieve 2.5 gallons
4. Proceed with standard extract and hop boiling (per hop schedule above)
5. Ferment 2-3 weeks at ale temperature (65-75°F
6. Bottle
7. Condition (at least 3 weeks at room temperature)
8. Drink

Stouts (as well as porters and most ales) are best served at ~55°F, which can be achieved by storing in a cool cellar or by placing room temperature bottles in the fridge for 15-20 minutes. Most heavier beers, like stouts, are supposed to continue to improve with age - 3 weeks in the bottles is considered by some still too young to drink. I do think that the beer I first brewed tastes better now than it did when I first tried it, so I imagine this stout will taste even better in a month or two than it does now (if there's any left!). Happy St. Patrick's Day!

Monday, March 16, 2009

Spring's A'comin'

It's comforting to know that there are still some seasonal cycles that you can rely on. Below are two signs that Spring is almost here in New England.


Sunday, March 15, 2009

More sowing

After getting my lettuce seeds in the ground yesterday, I felt emboldened to sow a few more veggies today - carrots, swiss chard, and arugula. I may be pushing things a bit, especially with the carrots, but from what I've read, I think this might work (I am trusting the University of Rhode Island Master Gardening planting calendar - we're not in RI, but we're close and in the same USDA Hardiness Zone). The arugula went into the other side of the lettuce cold frame and the carrots and swiss chard went into the cover-less cold frame, which makes it just a "frame" I guess (BTW the cover got blown off last summer during a particularly blustery storm). UPDATE: Nighttime temperatures in the teens got me worried so I rigged a temporary cover out of a clear plastic landscaping sheet and some logs/rocks to keep it from blowing away. I expect I'll need to replant when it gets warmer.

Arugula:


Swiss chard:


Carrot:

Saturday, March 14, 2009

Planting lettuce

I decided to sow a crop of lettuce outside today. I know it's only the middle of March, but lettuce is a cool weather plant and I sowed the seeds in a cold frame. All in all, I'm hoping this will give us a jump on the growing season. I've sowed lettuce seeds in the cold frame the past few years, but never this early, so this is an experiment of sorts. The soil temperature inside the cold frame is above 50°F and even with the air temp in the low 50s, the cold frame was maintaining 70°F - ideal conditions for the Spring Mix we ordered from The Cook's Garden. If all goes well, we'll be eating fresh salad by early May.


Monday, March 2, 2009

Happy Birthday, Dr. Seuss!

Theodor Seuss Geisel, aka Dr. Seuss, was born this day in 1904. Of all his amazing works, this one seems most appropriate here.


Sunday, March 1, 2009

Roast Chicken

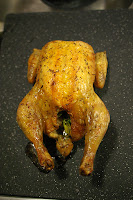
Here's a recipe that I tried for the first time this week that I think came out superb. Actually, it's the roasting technique that I tried out for the first time. Here's the thing about a whole roasted chicken - there are two separate pieces to the recipe. First you have the seasoning/flavor components and second you have the roasting technique. The seasoning is the easy part - just use what you like. But the technique can be the difference between a bird that cooks perfectly in an hour and a bird that comes out still raw in the middle. The technique I used was from Cook's Illustrated New Best Recipes cookbook and after tasting the results, I plan on using it again and again.

Roast Chicken
1 3-4 lb whole chicken, giblets removed
1 carrot, cut or snapped into 2-3 inch pieces
1 celery stalk, cut or snapped into 2-3 inch pieces
1/2 a medium onion
2 cloves of garlic
olive oil
salt
pepper
dried thyme

1. Pre-heat oven to 375oF
2. Rinse chicken. Dry well.
3. Lightly coat entire chicken with oil
4. Place Stuff carrot, celery, onion, and garlic in cavity
5. Season with salt, pepper, and thyme - be sure to add some to the cavity as well
6. Place chicken, wing-side up, on v-rack in roasting pan (yes, wing-side up) - if you don't have a v-rack, use some tin foil molded into a ring to help prop the chicken up
7. Roast for 15 minutes
8. Rotate chicken so the other wing is up
9. Roast for 15 minuted
10. Rotate chicken, breast-side up
11. Turn oven up to 450oF
12. Roast for another 25-35 minutes
13. Remove from oven when an instant-read thermometer registers 170oF in the middle of the thigh
14. Place chicken on cutting board and let rest, uncovered, for 10 minutes before carving

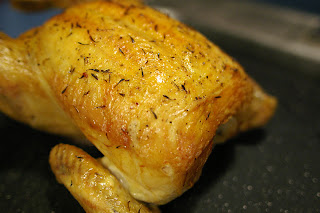
The chicken came out incredible - perfectly browned on the outside and moist on the inside. I served it with some rice pilaf and a mixed greens salad (for the grown ups; the kids had carrot sticks with ranch dressing). Everyone cleaned their plates. We got the chicken on sale at Whole Foods for $1.99/lb, so all told, this meal probably cost under $12 total. Actually, with leftovers and a chicken carcass to make soup with, I'll end up with two home cooked meals using quality ingredients for under $12. Not a bad deal if you ask me.